User
The user module can be accessed like this:
Check availability
The user account functionality is not available on other domains that embed your CrazyGames game. Before using any user account features, you should always ensure that the user account system is available.
Get current user
You can retrieve the user currently logged in CrazyGames with the following method:
If the user is not logged in CrazyGames, the returned user will be null
The returned user object will look like this:
{
    "username": "SingingCheese.TLNU",
    "profilePictureUrl": "https://images.crazygames.com/userportal/avatars/4.png"
}
System info
You can retrieve the system info with the following method:
The response will look like this:
{
    "countryCode": "US",
    "device": {
        "type": "desktop" // possible values: "desktop", "tablet", "mobile"
    },
    "os": {
        "name": "Windows",
        "version": "10"
    },
    "browser": {
        "name": "Chrome",
        "version": "107.0.0.0"
    }
}
For browser and os, the format is the same as ua-parser-js.
Auth prompt
By calling this method, the log in or register popup will be displayed on CrazyGames. The user can log in their existing account, or create a new account. The method returns the user object.
The following error codes can be returned:
showAuthPromptInProgress- an auth prompt is already opened on the websiteuserAlreadySignedIn- the user is already logged inuserCancelled- the user closed the auth prompt without logging in or registering
Get user token
The user token contains the userId of the player that is currently logged in CrazyGames, as well as other useful information (username, profilePictureUrl, etc). You should send it to your server when required, and verify/decode it there to extract the userId. This is useful for linking the user accounts for example, where you can have a column "crazyGamesId" in your user table that will be populated with the user id from the token.
You can retrieve the user token with the following method:
The token has a lifetime of 1 hour. The method will handle the token refresh. We recommend that you don't store the token, and always call this method when the token is required.
The following error codes can be returned:
userNotAuthenticated- the user is not logged in CrazyGamesunexpectedError
The returned token can be decoded for testing purposes on jwt.io.
The token payload will contain the following data:
{
    "userId": "UOuZBKgjwpY9k4TSBB2NPugbsHD3",
    "gameId": "20267",
    "username": "RustyCake.ZU9H",
    "profilePictureUrl": "https://images.crazygames.com/userportal/avatars/16.png",
    "iat": 1670328680,
    "exp": 1670332280
}
When you need to authenticate the requests with your server, you should send the token together with the requests.
The token can be verified with the public key hosted at this URL https://sdk.crazygames.com/publicKey.json. We recommend that you fetch the key every time you verify the token, since it may change. Alternatively, you can implement a caching mechanism, and re-fetch it when the token fails to decode due to a possible key change.
Here is a TypeScript example that will help you decode and verify the token:
import * as jwt from "jsonwebtoken";
import axios from "axios";

export interface CrazyTokenPayload {
    userId: string;
    gameId: string;
    username: string;
    profilePictureUrl: string;
}

export const DecodeCGToken = async (
    token: string
): Promise<CrazyTokenPayload> => {
    let key = "";

    try {
        const resp = await axios.get(
            "https://sdk.crazygames.com/publicKey.json"
        );
        key = resp.data["publicKey"];
    } catch (e) {
        console.error("Failed to fetch CrazyGames public key", e);
    }

    if (!key) {
        throw new Error("Key is empty when decoding CrazyGames token");
    }

    const payload = jwt.verify(token, key, { algorithms: ["RS256"] });
    return payload as CrazyTokenPayload;
};
Auth listener
You can register user auth listeners that are triggered when the player logs in CrazyGames. A log out doesn't trigger the auth listeners, since the entire page is refreshed when the player logs out.
const listener = (user) => console.log("User changed", user);

// add listener
window.CrazyGames.SDK.user.addAuthListener(listener);

// remove listener
window.CrazyGames.SDK.user.removeAuthListener(listener);
After detecting a login using the Auth Listener, if you use the CrazyGames account as an identifier you should fetch the user's progress from your back-end.
If you rely on the CrazyGames automatic progress save, our system automatically reloads the game in case of a login.
Account link prompt
If you'd like to keep other sign in providers (Google or Facebook for example), you'll need to handle account linking between the CrazyGames account and the other providers. Check User linking page to find out more about user account linking.
For requesting the user's permission to link their CrazyGames account to the in-game account, please use the provided account link modal and avoid implementing it yourself. This provides the players with a standard modal, and also allows them to select the "Always link accounts" option (coming soon).
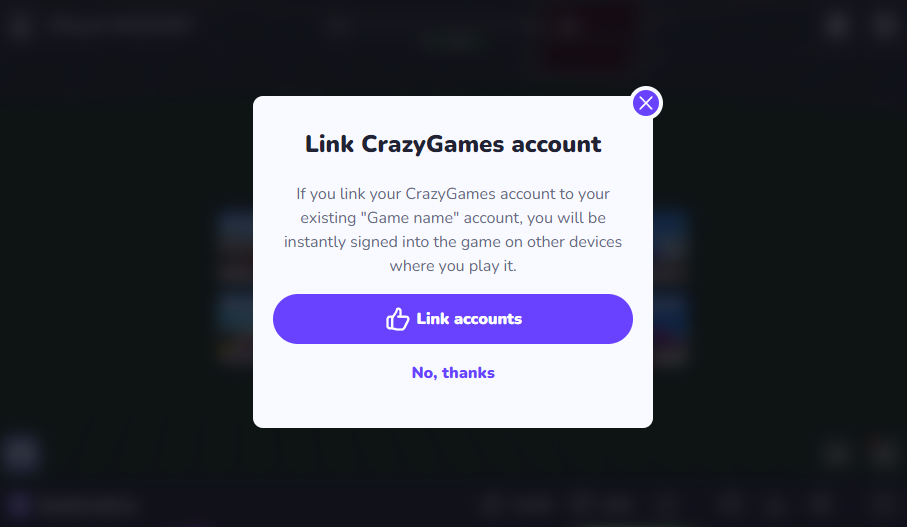
You can display the modal by calling the following method:
The response object will be either { "response": "yes" } or { "response": "no" }
The following error codes can be returned:
showAccountLinkPromptInProgress- the link account modal is already displayeduserNotAuthenticated- the user is not logged in CrazyGames
Testing
Local
When the SDK is in the local environment (on 127.0.0.1 or localhost) it will return some hardcoded default values for the method calls in the user module.
You can customize the returned local values by appending these query parameters:
?user_account_available=falsewill change the response from theisUserAccountAvailablemethod tofalse(it returnstrueby default).?show_auth_prompt_response=will change the response from theshowAuthPromptmethod. It accepts the following values:user1,user2,user_cancelled?link_account_response=will change the response from theshowAccountLinkPromptmethod. It accepts the following values:yes,no,logged_out?user_response=will change the response from thegetUsermethod. It accepts the following values:user1,user2,logged_out?token_response=will change the response from thegetUserTokenmethod. It accepts the following values:user1,user2,expired_token(to return an expired token),logged_out
By default, getUser returns user1, getUserToken returns token for user1, showAccountLinkPrompt returns yes, showAuthPrompt returns user1, and isUserAccountAvailable returns true.