Introduction
When integrating the CrazyGames SDK, make sure to follow our requirements. They will help you use the SDK in the best way possible and guide you in terms of technical, gameplay, ads and account integration requirements.
Our HTML5, Unity, and Godot SDKs support all the scenarios. Other SDKs miss certain functionalities for which you can usually manage at least basic integration through the HTML5 version. Most game engines that support WebGL also have a way of interacting with JavaScript when running in browser.
The SDK has the following modules:
ad | display video ads & detect adblockers | 🟩 Fully supported |
banner | display banners | 🟩 Fully supported |
game | various game events and integration | 🟩 Fully supported |
user | interact with logged in user | 🟩 Fully supported |
data | store user data that persists across devices | 🟩 Fully supported |
| In-game Purchases | handle in-game purchases (not a separate module) | 🟩 Fully supported |
ad | display video ads & detect adblockers | 🟩 Fully supported |
banner | display banners | 🟥 Not supported |
game | various game events and integration | 🟩 Fully supported |
user | interact with logged in user | 🟩 Fully supported |
data | store user data that persists across devices | 🟩 Fully supported |
| In-game Purchases | handle in-game purchases (not a separate module) | 🟩 Fully supported |
Getting started
This section explains how to get the CrazyGames SDK up and running in your engine.
You can install the SDK by including the following script in the head of your game's index.html:
<!-- Load the SDK before your game code -->
<script src="https://sdk.crazygames.com/crazygames-sdk-v3.js"></script>
Manual initialization
The v3 SDK requires initialization before being used. This can be done by calling the init method:
It is important to await for the initialization since it happens asynchronously, and the SDK is unusable until initialized. We recommend that you do this before the game starts, for example on the loading screen.
Promises
The SDK relies on promises and doesn't accept a callback parameter. If you don't have the possibility to use await, you can call the async methods with .then(...).catch(...), like in the example below:
// await example
try {
    const user = await window.CrazyGames.SDK.user.getUser();
    console.log(user);
} catch (e) {
    console.log("Get user error: ", e);
}

// .then .catch example
window.CrazyGames.SDK.user
    .getUser()
    .then((user) => console.log(user))
    .catch((e) => console.log("Get user error: ", e));
The HTML5 SDK docs will contain only examples using await.
Start by downloading the Unity SDK.
You can find the changelog here.
Info
Before importing the SDK, we recommend that you delete the folders CrazySDK and CrazyOptimizer (if present).
The SDK is found in the CrazyGames namespace, which you will have to import at the start of your files:
- Before calling any SDK related functionality, please ensure that
CrazySDK.IsAvailableis true. The CrazySDK is available on CrazyGames, when running in Editor, and when running on localhost. - The SDK will not be available when your game runs on any other platform (Android, iOS, etc). It will also not be available when running on a whitelisted domain (see Sitelock).
CrazySDK.IsAvailablewon’t work for iframed games. To check if the game is running on CrazyGames you can add a query parameter to your iframe URL when submitting, for exampleisCrazyGames=true, and then check usingApplication.absoluteURL.Contains("isCrazyGames=true").
Initialization
Manual initialization
The SDK needs to be manually initialized like this:
Since the initialization is done asynchronously, please don't call any methods from the SDK until the callback provided to the Init is called.
When initializing the SDK, please avoid doing this in methods with this attribute [RuntimeInitializeOnLoadMethod(RuntimeInitializeLoadType...)]. The SDK itself relies internally on RuntimeInitializeOnLoadMethod for various things like sitelock, which may end up conflicting with your own RuntimeInitializeOnLoadMethod. It is better to perform the initialization in a separate scene, check CrazySDK/Demo/LoadingScene for an example.
To help you, we have created a demo loading scene, that you can modify or use as it is. When the game is running on CrazyGames the scene will init the SDK and wait for initialization and then continue to another scene. If your game is running on a whitelisted domain (see Sitelock), the initialization will be skipped, as the SDK is disabled there.
Checking Initialization Status
Instead of relying only on callbacks, you can also poll the initialization status:
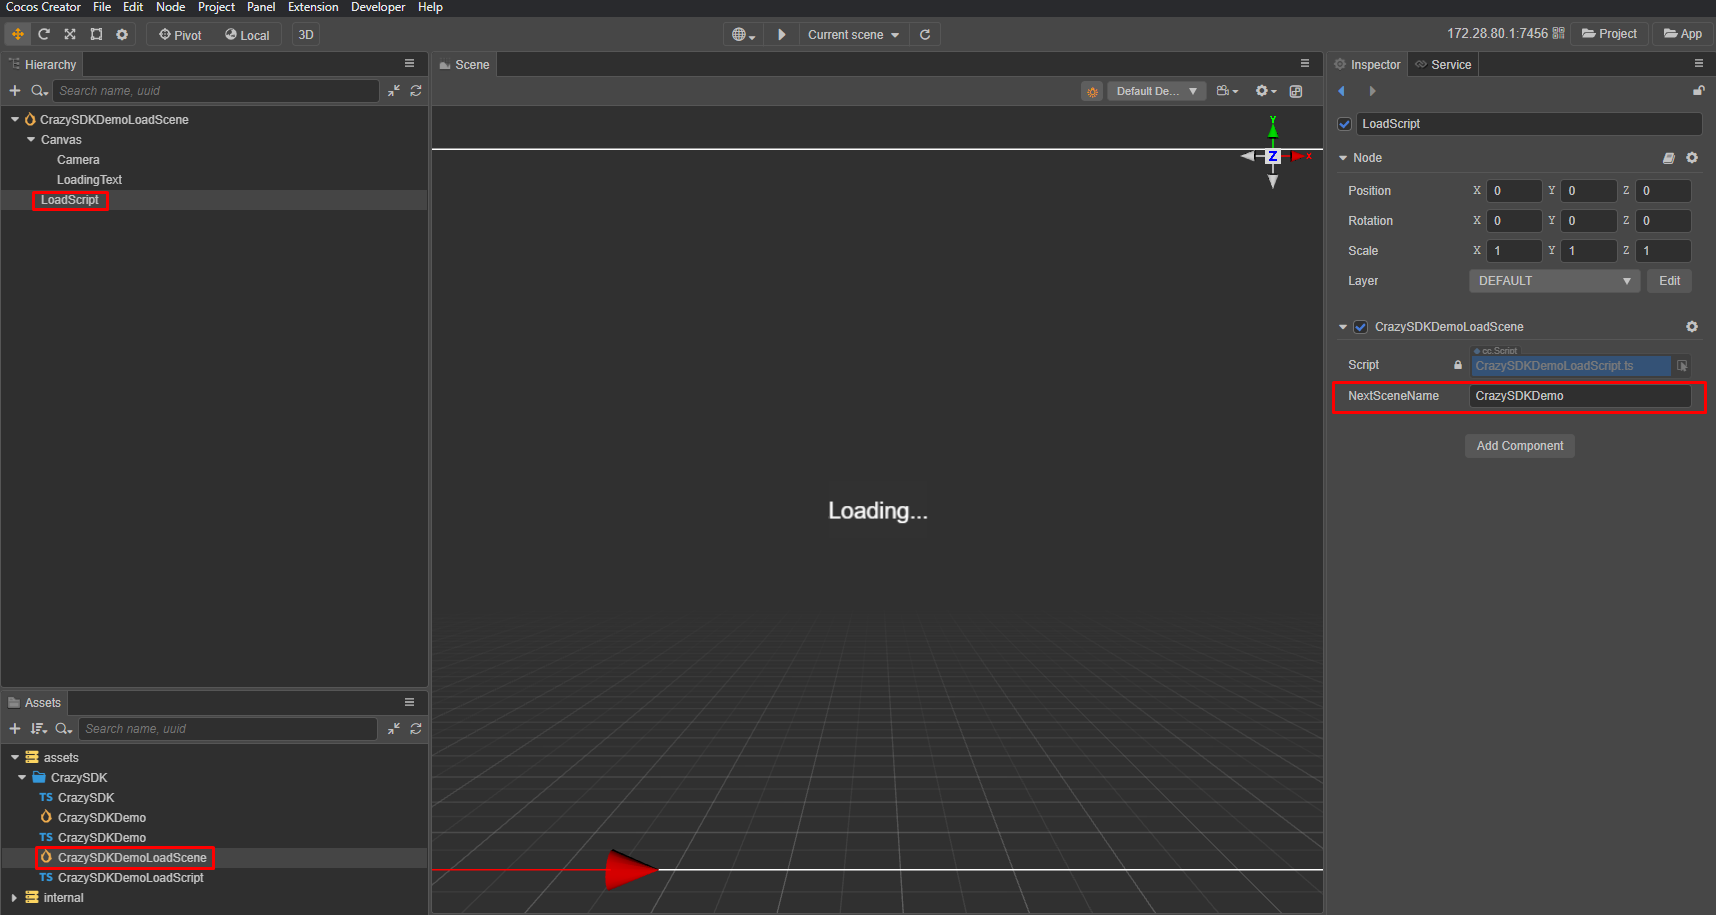
You can find the demo loading scene here:
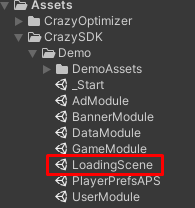
Don't forget to drag it into the included scenes in the build as the first scene, and set the nextSceneName in CrazySDKLoadingScene object.
Info
Don't forget to check the custom build feature to get more optimized builds.
Start by downloading the CrazyGames SDK.
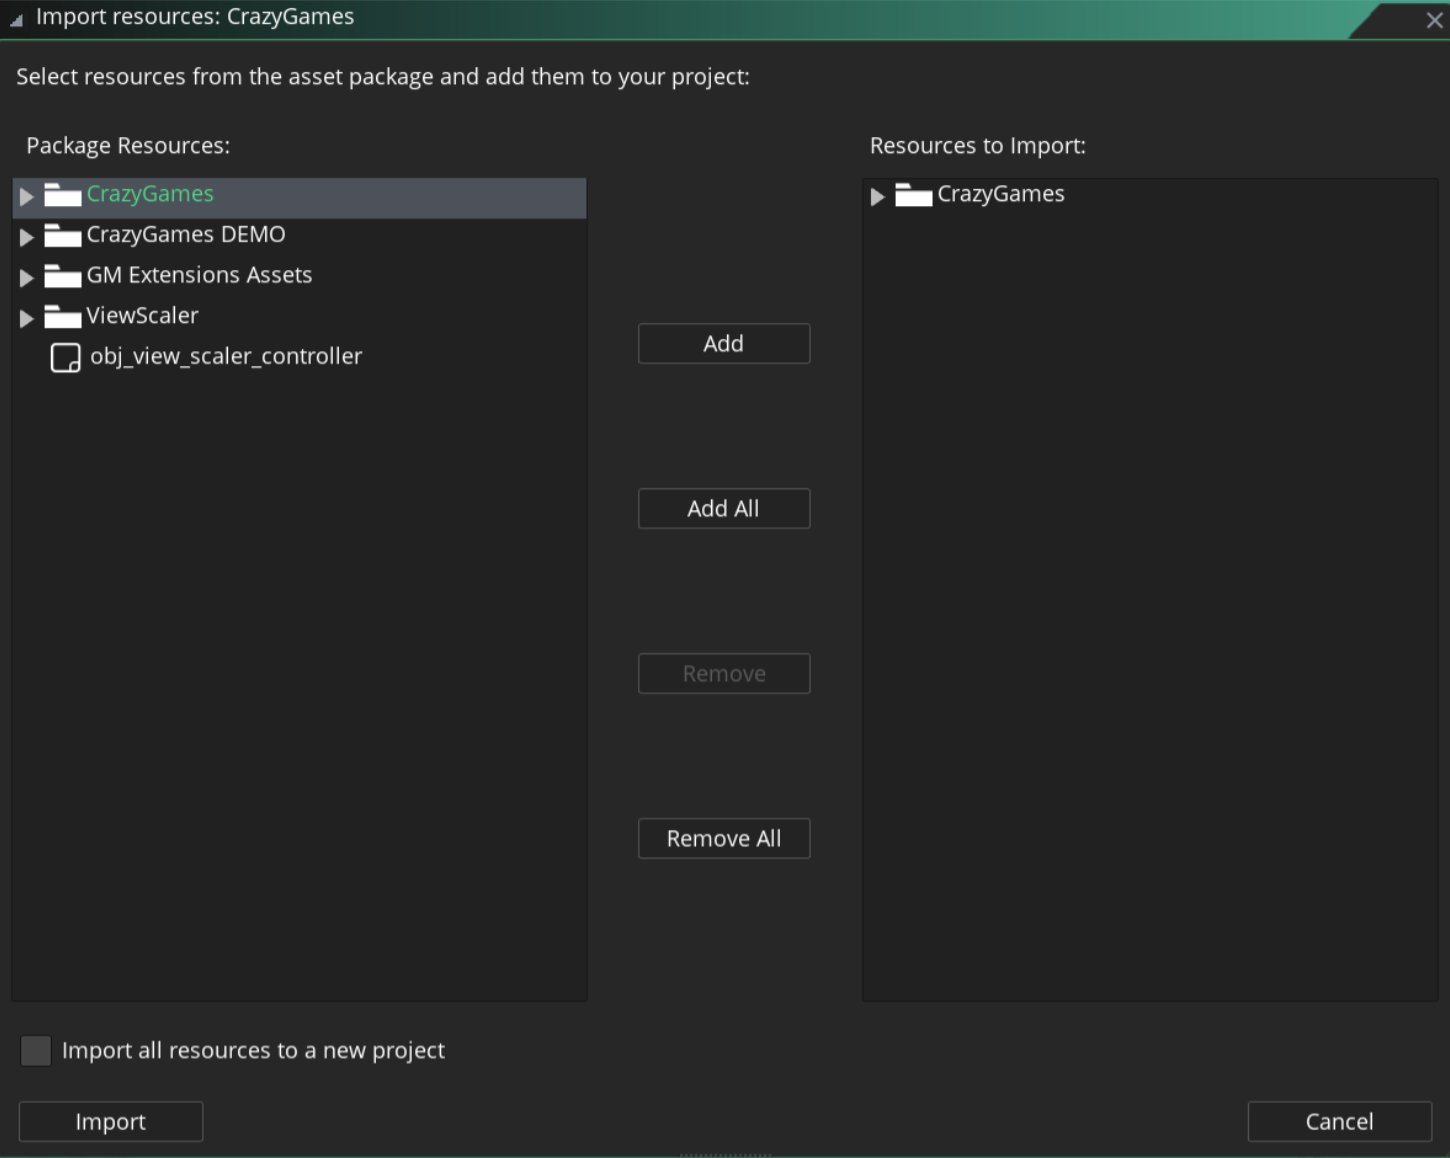
Once you downloaded the extension you need import it in your GameMaker studio from Tools -> Import Local Package
- The CrazyGames folder contains everything you need to integrate our SDK: the extension and enum and constant definitions.
- CrazyGames DEMO contains a demonstration on how to use the CrazyGames functions. If you want to use it you should also include the GM Extensions folder.
- ViewScaler and obj_view_scaler_controller contain a recommendation of how handle the canvas resolution.
At this point you already can run the CrazyGames functions if you run on HTML export.
As a first function you should initialize the SDK:
crazy_init(
    function() { show_debug_message("CrazyGames SDK initialized successfully!"); },
    function(error) { show_debug_message("Failed to initialize CrazyGames SDK: " + string(error)); }
);
This function checks whether the CrazyGames SDK has been successfully initialized.
All the functionality of our SDK is showcased in this demo project. To avoid weird browser behavior, right-click the link, and select Save link as. The project contains a CrazySDKDemo layout, and a CrazySDKDemo event sheet, which contain SDK usage examples.
Warning
The CrazyGames SDK is not working with Construct Worker mode.
Worker mode can be disabled by selecting your project in the Project panel, going to Advanced, and setting Use worker to No.
You will need to create a separate layout for loading and initializing the SDK. Our demo project contains an example layout called CrazySDKLoadingDemo. That layout should contain a System > On start of layout script with these contents:
// don't forget to set the name of the next layout
// that should be loaded after initialization
const nextLayoutName = "CrazySDKDemo";
const sdkElem = document.createElement("script");
sdkElem.type = "text/javascript";
sdkElem.src = "https://sdk.crazygames.com/Construct3CrazySDK-v3.js";
document.body.appendChild(sdkElem);
sdkElem.onload = function () {
    window.ConstructCrazySDK.init()
        .then(() => {
            runtime.goToLayout(nextLayoutName);
        })
        .catch((e) => console.log("Failed to init CrazySDK", e));
};
sdkElem.onerror = function () {
    console.error("Failed to load Construct3CrazySDK script.");
};
The script will load our SDK, initialize it, and continue to nextLayoutName.
The SDK functionality is implemented in JavaScript, so to call various features from the SDK, you will need to add scripts to your event sheets. When right-clicking on your events, you will get an "Add script" option, which will add a small text editor where you can write the code.
- Start by downloading the Godot SDK.
- Copy
crazysdk-godot-3into your project asres://addons/crazygames. - Enable the plugin in
Project -> Project Settings -> Plugins. - Before calling any SDK related functionality, ensure
CrazyGames.is_initialisedistrue:
- Start by downloading the Godot SDK.
- Copy
crazysdk-godot-4into your project asres://addons/crazygames. - Enable the plugin in
Project -> Project Settings -> Plugins. - Before calling any SDK related functionality, ensure
CrazyGames.is_initialisedistrue:
Download the Cocos SDK.
Right-click on the assets folder in the Assets panel and select Import Asset Package.
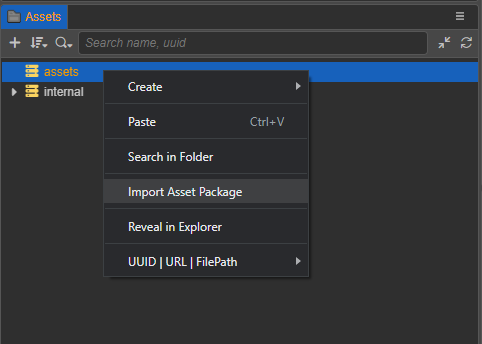
Be sure all the files are selected and click Import.
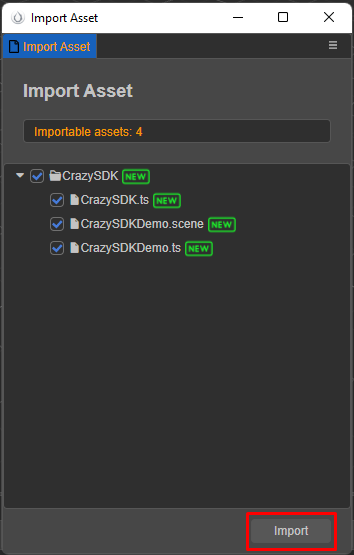
You can now open the CrazySDK/CrazySDKDemo scene to view the functionality of the SDK.
To use the SDK, import it into your files:
Before using the SDK, please ensure the current platform is supported:
The supported platforms are the mobile and desktop browsers.
Initialization
Manual initialization
The SDK requires initialization before being used. This can be done by calling the init method:
It is important to await for the initialization since it happens asynchronously, and the SDK is unusable until initialized. We recommend that you do this before the game starts, for example on the loading screen.
To help you, we also created a demo loading scene, called CrazySDKDemoLoadScene. Ensure this is the first scene loaded in your game, and also provide a next scene name to the script. It will wait for the SDK initialization, and then redirect to the next scene.
Important information
Don't miss this section with important information regarding your engine
Major changes when migrating from v2 to v3
You can find the docs for the old HTML5 v2 SDK here.
- The SDK requires to be manually initialized now
- Some async get methods are now simple variables:
window.CrazyGames.SDK.environmentwindow.CrazyGames.SDK.user.isUserAccountAvailablewindow.CrazyGames.SDK.user.systemInfo
- Methods to report loading changed from
sdkGameLoadingStart()andsdkGameLoadingStop()toloadingStart()andloadingStop() -
The v2 SDK was throwing inconsistent errors (strings or objects). The v3 SDK has now the following error format:
Optimization
Optimization is important for launching succesful games on the web:
- We suggest that you read the following Unity WebGL optimization tips. They may help you to reduce the final build size and increase the performance of your game, thus increasing your revenue.
- Furthermore, check the custom build feature that the CrazySDK provides.
- CrazyGames supports only compressed builds (either Brotli or Gzip). This means that the development builds won't run on CrazyGames, since they are not compressed.
Sitelock
Sitelocking is done automatically on game start. It allows your game to run only on CrazyGames.com and our affiliated sites. This ensures that your game cannot be stolen and hosted on other domains, so you do not lose any revenue.
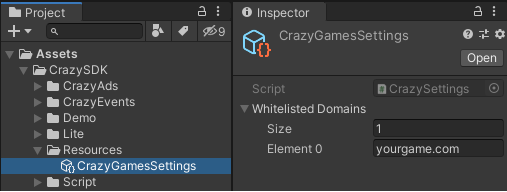
By default, the sitelock will also block the game on your domain. To avoid this, you should add your domain to the list of whitelisted domains in the CrazySDK settings. You can find the settings in CrazySDK/Resources/CrazyGamesSettings.
Info
When reimporting the SDK, Unity resets these settings.
If you require access to the older GameMaker SDK docs, you can reach out to us.
Local data
Be careful: unlike most engines that save data in localstorage, Construct uses a custom save mechanism.
The addon uses JavaScript + yield(...) style async handling. Callback signals are exposed through CrazyGamesBridge.callbacks.
On non-web exports, the SDK marks itself initialized immediately so is_initialised_async() does not block forever.
The addon uses JavaScriptBridge + await style async handling. Callback signals are exposed through CrazyGamesBridge.callbacks.
On non-web exports, the SDK marks itself initialized immediately so is_initialised_async() does not block forever.
No important information for Cocos.
Development & Testing
During the development, you will be running your game on different domains/environments:
localhost- our SDKs work fine on localhost domains, where they display demo ads/banners and try to simulate other behaviour.editors- this applies to Unity, Construct, Cocos, etc. In editors our SDKs will also display demo ads/banners and try to simulate other behaviour.Preview tool- our QA environment (oncrazygames.com/preview) offers the most realistic version of CrazyGames.com. After you've finished integrating the SDK, create a new game on Developer Portal, upload your files, and you will be able to preview your game. Obtaining a working Xsolla token is possible only here.
- The
localhostand127.0.0.1domains are consideredlocalenvironments. Advertisements are not available. Instead, an overlay text will be displayed. For other events such as happy time, gameplay start, etc. the console output can be consulted. If you are using a different domain/ip for local development, you can always enforce thelocalenvironment by appending the?useLocalSdk=truequery parameter to the URL in your browser. - On
CrazyGamesdomains the SDK has thecrazygamesenvironment, where it functions properly. - On any other domains (including your domain on which you may host your game) the SDK has the
disabledenvironment. All the calls to the SDK methods will throw an error. To prevent this, we recommend checking on which environment the SDK is running and avoiding making use of it outsidelocalorcrazygamesenvironments.
The environment can be retrieved like this:
You can test the SDK in the editor and by building and running your game on localhost. When testing the project locally, please ensure that it runs on localhost or 127.0.0.1, otherwise the sitelock will block it.
You can test your game at any time in Game Maker's debug mode.
You can test the SDK with Construct preview, or by building and running the game locally.
Export your project with the CrazyGames export preset, rename the exported HTML file to index.html, and run it on localhost (or 127.0.0.1) for local testing.
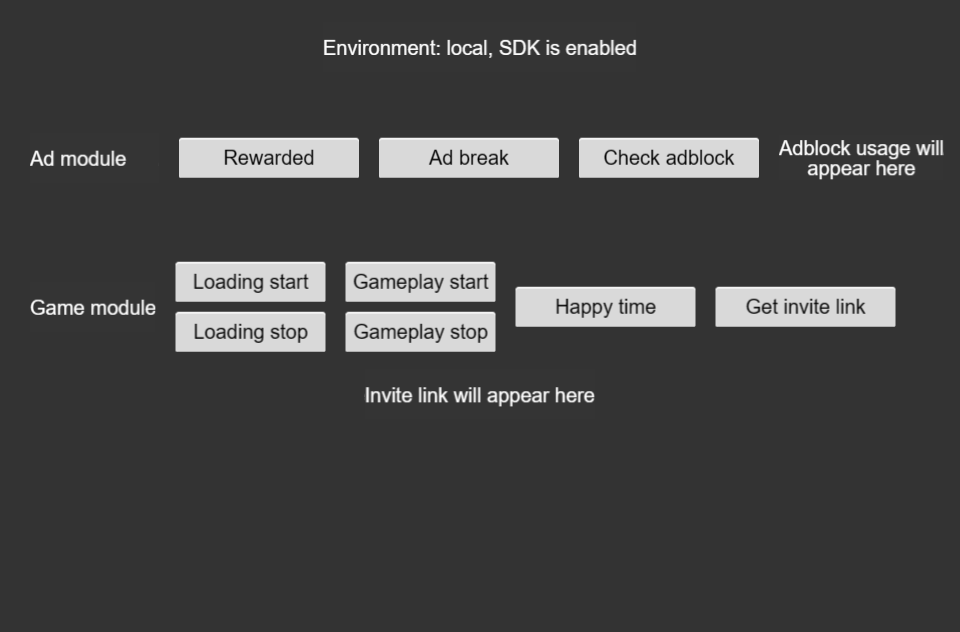
On localhost or 127.0.0.1 the SDK starts into local mode. This will do the following things:
- The calls to request
rewardedandmidgamevideos will display an overlay text. - SDK console logging will be enabled.
- Requesting user data will return some demo date.
- Only demo banners will be displayed.
If you want to enforce the local mode on other domain/ip, you can do it by appending the ?useLocalSdk=true query parameter to the URL in your browser.
On CrazyGames domains, the SDK will work as expected.
On any other domains the SDK is disabled. This means all the method calls to the SDK will throw errors about the SDK beeing disabled. To prevent this, we recommend that you check if the SDK environment is not disabled before calling any functionality: